
Face Recognition & Face Tracking via OpenCV and UDOO
Hi guys,
in this tutorial we’ll see how to implement an OpenCV App with Python and an Arduino sketch that read OpenCV data and moves a UDOO screen when you move your face in the UDOO camera range.
OpenCV is an open source computer vision and machine learning software library that makes possible to process images and to do face tracking, face detection, shape detection and other cool stuff. It has C, C++, Python and Java interfaces and supports Windows, Linux, Mac OS, iOS and Android. OpenCV is written in optimized C/C++, so that the library can take advantage of multi-core processing.
OpenCV library is pre-installed on UDOObuntu
What we need is:
- UDOO
- MicroSD with Ubuntu pre-installed
- UDOO Camera Module or Compatible USB Camera
- 7” UDOO Screen
- 2 Servo Motors
- Knowledge of C/C++, Java or Python app Programming

7” UDOO screen
If you’ve met all the above requirements, let’s boot UDOObuntu! And let’s understand how the OpenCV library works and how the Sam3x Arduino controller is connected to IMX6, where UDOObuntu runs.
Remember that is necessary to enable the UDOO cam before doing something else; to enable it to take a look at the guide on this site.
In this simple project we used Python but you can also use Java or C/C++, just pay attention to import cv2 (as OpenCV library) in you project.
Remember that to use the serial port in Python you must import the serial library in the header of the script.
Before importing the serial library, you have to install it. To do this you have to open a terminal window and execute this instruction:
sudo pip install pyserial
So let’s start and check the code together!
This is what you need to run the App:
Python file, for example webcam.py
So let’s start and check some code!
These are the needed components of the App:
Python file, for example webcam.py
import cv2
import sys
import serial

# Create an object Serial with ttymxc3 port
ser = serial.Serial(
    port='/dev/ttymxc3',
    baudrate=115200,
    parity=serial.PARITY_ODD, # Optional
    stopbits=serial.STOPBITS_ONE, # Optional
    bytesize=serial.EIGHTBITS # Optional
)
# Check if Serial is Open, close it then re-open (to avoid exception)
if ser.isOpen():
    ser.close()
ser.open()

cascPath = sys.argv[1]
faceCascade = cv2.CascadeClassifier(cascPath)

# Set video source (UDOO Camera) and resolution
video_capture = cv2.VideoCapture(7)
video_capture.set(3,320)
video_capture.set(4,240)

while True:
    # Capture frame-by-frame
    ret, frame = video_capture.read()

    gray = cv2.cvtColor(frame, cv2.COLOR_BGR2GRAY)

    faces = faceCascade.detectMultiScale(
        gray,
        scaleFactor=1.2,
        minNeighbors=5,
        minSize=(30, 30),
        flags=cv2.cv.CV_HAAR_SCALE_IMAGE
    )

    # Draw a rectangle around the faces
    for (x, y, w, h) in faces:
		print ("x: ",x,", y: ",y)
		prov=str(x)
		prov = prov + 'x'
		ser.write(prov)
		prov=str(y)
		prov = prov + 'x'
		ser.write(prov)
		cv2.rectangle(frame, (x, y), (x+w, y+h), (0, 255, 0), 2)

    # Display the resulting frame
    cv2.imshow('Video', frame)

    if cv2.waitKey(1) & 0xFF == ord('q'):
        break

# When everything is done, release the capture
video_capture.release()
cv2.destroyAllWindows()
And here you can check the Arduino sketch:
#include

int data[3], v[2];
int i=0, j=0, n=0, prov=320, num, plus=320, plus1=240, aum=45, aum1=45;
char c;
Servo servo1;
Servo servo2;

void setup()
{
  servo1.attach(2);
  servo2.attach(3);
  Serial.begin(9600);
}

void loop()
{
  //Read Serial bus data received from Python and write them into servo position
  if(Serial.available())
  {
    prov=Serial.read()-48;
    if(prov!=72)
    {
      data[i]=prov;
      i++;
    }
    else
    {
      if(i==0)
        num=0;
      if(i==1)
        num=data[0];
      if(i==2)
        num=data[1]+data[0]*10;
      if(i==3)
        num=data[2]+data[1]*10+data[0]*100;
      i=0;
      v[n]=num;
      n++;
      if(n==2)
      {
        //Start X axis
        while(plus>0)
        {
          if((v[0]<=plus) && (v[0]>(plus-10)))
          {
            servo1.write(aum-5);
            delay(15);
            plus=0;
          }
          else
          {
            plus=plus-10;
            aum=aum+3;
          }
        }
        plus=320;
        aum=45;
        //Start Y axis
        while(plus1>0)
        {
          if((v[1]<=plus1) && (v[1]>(plus1-10)))
          {
            servo2.write(aum1);
            delay(15);
            plus1=0;
          }
          else
          {
            plus1=plus1-10;
            aum1=aum1+3;
          }
        }
        plus1=240;
        aum1=45;
        n=0;
      }
    }
  }
}
After this simple code, you have to download an xml file that describe a figure or an object: this xml file is the most used and accurate to detect face but actually is not very performant.
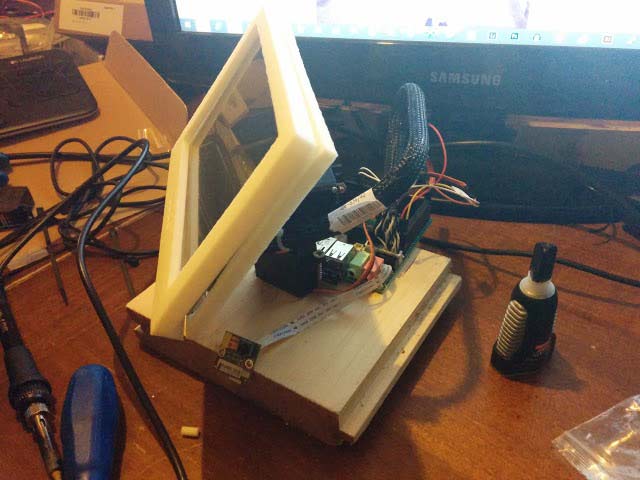
Here is a prototype:

Finally to run your python script you have to open a terminal window and write
sudo python file_name.py xml_name.xml
In this case:
sudo python webcam.py haarcascade_frontalface_default.xml
Here you can download the complete code of this example demo.
So, here’s the final result!
by MakerMark aka Marco Mancini,
marco.mancini@udoo.org
on Twitter: @MakerMarkIT
Maker, Android Developer and code-problem-solver at UDOO board
Submit a comment